

Installing Eclipse for C Cross Development
The Eclipse base provides a framework only, which includes a text editor, project manager and a few more tools like a debugging interface. It had been initially designed for the Java programming language. Due to its versatile plug-in interface, there are many extensions available, which make Eclipse a universal tool for all kind of software development.
The Eclipse Foundation offers a number of ready-to-use packages, including the Eclipse IDE for C/C++ Developers. However, most features are useless for embedded C programming and a few are still missing. Many newcomers are easily confused by the overwhelming number of configuration items and optional settings. Therefore, we recommend to start with the bare metal version and then add a few essential features only.
Prerequisites
To install and run Eclipse, you will need a PC with Java Runtime Environment, preferably build 1.6 (Java Version 6).
Downloading
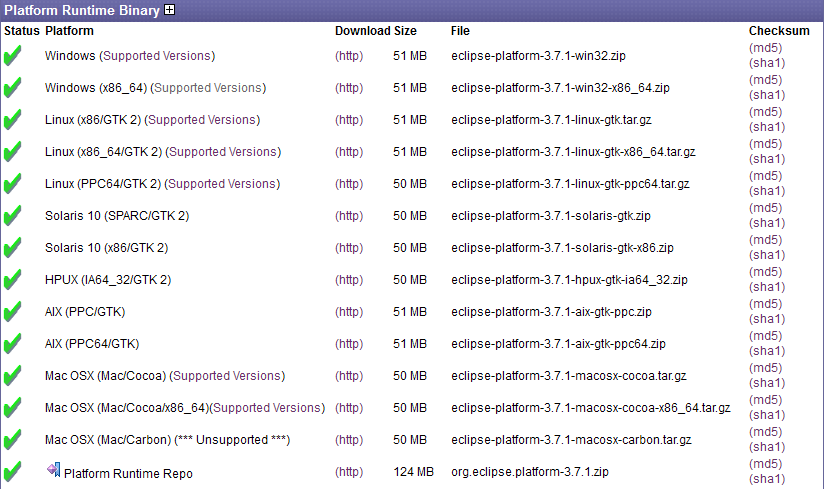
The basic Platform Runtime Binary is not available on the main download page, but hidden on the release build page. At the time of this writing, the latest stable build was 3.7.1, available on this page. Be prepared, that this page may become outdated, moved to another location or even be completely removed. In that case you should check the Eclipse project downloads for the right link.
Look out for the runtime binary that fits to your PCs operating system.
Unpacking
The runtime binary is packed in a standard archive, either zip for Windows or tar.gz for Linux and OS X. Unpack it into any directory of your choice, preferably C:\ on Windows or ~/ on Unix-like systems.
Adding Required Features
For C cross development some additional features are required, which can be directly downloaded from within Eclipse. Thus, start the Eclipse binary that has been unpacked in the previous step. You can do this either from the command line or by using a graphical file explorer.
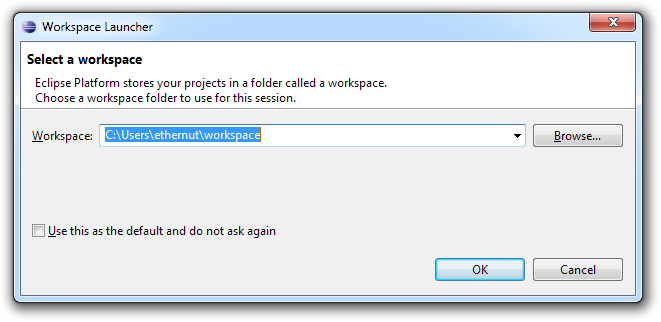
The first dialog will ask for the workspace location. Right now this is meaningless, so simply click on OK.
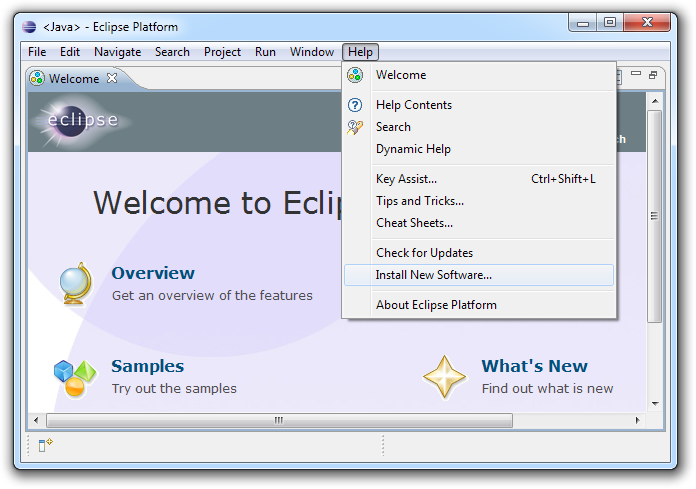
If started for the first time, Eclipse will now show its welcome page. To install additional features, select Install New Software in the Help menu.
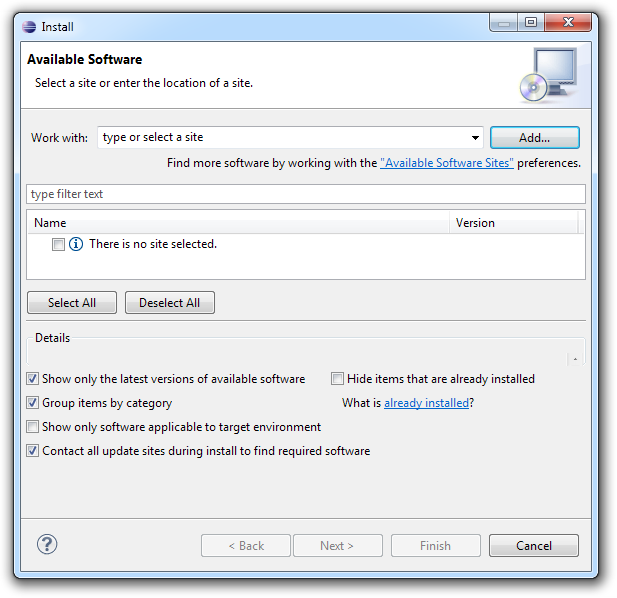
The next dialog allows us to download and install new features from various sources. Click on Add to select a site.
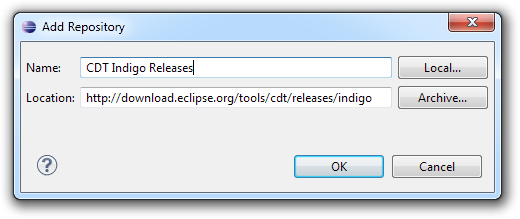
We want to install parts of the C development tools for Eclipse Indigo, which are available at http://download.eclipse.org/tools/cdt/releases/indigo . Enter this link as the location and give this repository meaningful name, e.g. CDT Indigo Release. If you installed a different version of Eclipse, then you probably need a different link.
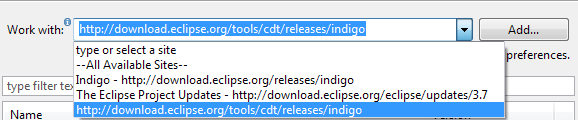
Click on OK to return to the previous dialog. If this is not possible and if you get an error message of a duplicate location...

...then the link already exists. Click Cancel and, back in the previous dialog, click on "Available Software Sites" and select the Tools/CDT link from the list. Back in the previous dialog, you can select the CDT repository from the drop down box.
Eclipse will now try to connect the given link and request the available features. This may take some time. Finally a list of features is presented.
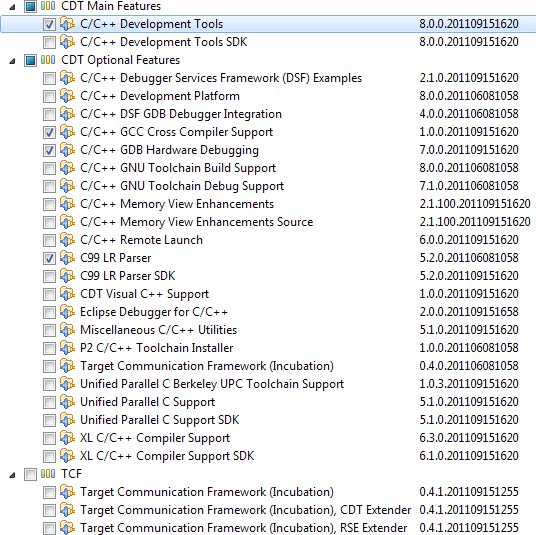
The main feature, that we select, is named C/C++ Development Tools. We do not need to install the related SDK. Feature SDKs typically contain the feature's Java source code and related documentation, which are interesting only for Eclipse feature developers.
Several of the optional features might be of interest, but several of them are already included in the main feature, so we must not select them again as an optional feature:
- C/C++ Development Platform
- C/C++ DSF GDB Debugger Integration
- C/C++ GNU Toolchain Build Support
- C/C++ GNU Toolchain Debug Support
- CDT Common GDB Support
- P2 C/C++ Toolchain Installer
We definitely need the C/C++ GCC Cross Compiler Support (quite obvious for cross development, isn't it). We further need C/C++ GDB Hardware Debugging. This feature will enable us to debug our application on the target system via JTAG. The C99 LR Parser is not really required, but depending on our C source code this feature might be helpful.
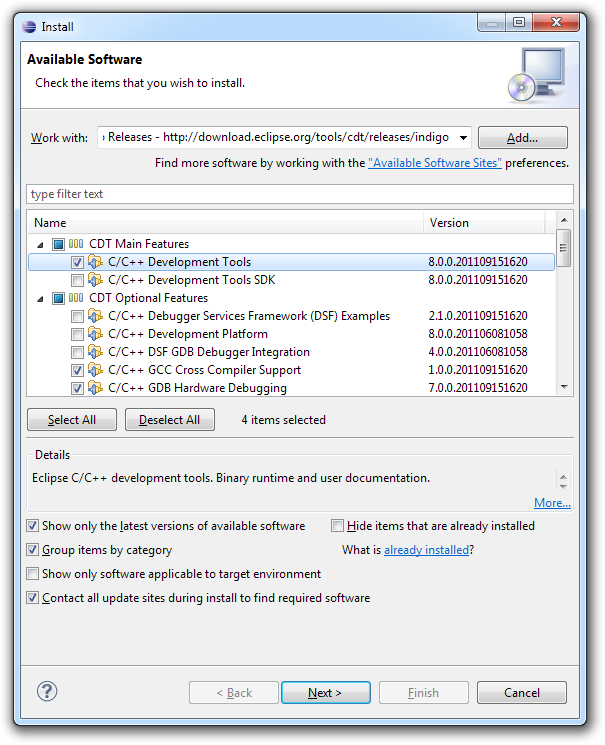
You may want to install other features as well. We recommend to limit yourself to the minimal selection on a first run. Any feature may be installed or removed at any later time. When done, click Next to start the dependency check. This will take several minutes. It may be possible, that an error is reported. Simply click the Back button and then click Next again.
After all features had been successfully check, Eclipse will let you review your selection. When clicking Next again, you will be asked you to accept the related license terms. If you agree by enabling I accept the terms..., you will be able to click on Finish.
All requested features will be downloaded and installed, which will take time again.

Finally restart Eclipse to activate the update.

Next Step
We are now ready to configure the Eclipse IDE.