
Creating the Nut/OS Configurator
This article describes the early design of the Nut/OS Configurator. It is largely outdated and kept for historic reasons.

Nut/OS offers three configuration utilities.
- nutconf
A GUI tool for the Win32 and Linux/GTK environment. - configure
A shell script to be used on Linux. - configure.exe
A DOS command line tool similar to the Linux shell script. This is deprecated.
The file UserConf.mk contains a few entries, which are used by the make utility during the rebuild process. It's a plain text file and may be edited manually.
This simple procedure was quite satisfying for Nut/OS 3.4, supporting two similar target CPUs, two host operating systems and two compilers only. However, with the new version 3.5 and upcoming 4.0 of Nut/OS, which is currently under development, many things will completely change. It will be much more configurable, support several target platforms including 32-bit microcontrollers and should not require manual source code modifications when ported to different hardware designs. Obviously the existing configuration tools (or their users) will reach the limits.
![]() Some time had been spent to search the web for similar but more advanced
tools and such a tool had been found, the
eCos
Configuration Tool Version 2.
It provides a very versatile GUI based on the highly portable
wxWidgets
class library. In addition, the configuration rules are based on the
Tcl
(Tool Command Language, pronounced tickle), which offers capabilities
far beyond those simple name=value configurations.
Some time had been spent to search the web for similar but more advanced
tools and such a tool had been found, the
eCos
Configuration Tool Version 2.
It provides a very versatile GUI based on the highly portable
wxWidgets
class library. In addition, the configuration rules are based on the
Tcl
(Tool Command Language, pronounced tickle), which offers capabilities
far beyond those simple name=value configurations.
 However, the brighter the light, the darker the shadows. The eCos tool
makes heavy use of C++ templates, which are difficult to understand and
are sometimes difficult to port. Similar, Tcl is heavy stuff too. The
author of this preview (quoting Joan Armatrading: Me, myself and I) spent
days to make it work on W2K. One really weird part was, that you need to run
VC++
in the cygwin environment. Still there had been tons of warnings from the
compiler. (Everybody who knows me, is aware, that I hate compiler warnings
more than stepping into dog shit.) Beside that, I do not know much about
Tcl, but several weeks before starting this project,
I stumbled over
Lua, a simple and
well documented script language designed and implemented by a team at Tecgraf,
PUC-Rio, Brazil. The initial intention was, to use Lua as a script language
for programming Ethernut applications. I still have no idea, if this is
possible,
but Lua would also make a good replacement for Tcl as a configuration language.
However, the brighter the light, the darker the shadows. The eCos tool
makes heavy use of C++ templates, which are difficult to understand and
are sometimes difficult to port. Similar, Tcl is heavy stuff too. The
author of this preview (quoting Joan Armatrading: Me, myself and I) spent
days to make it work on W2K. One really weird part was, that you need to run
VC++
in the cygwin environment. Still there had been tons of warnings from the
compiler. (Everybody who knows me, is aware, that I hate compiler warnings
more than stepping into dog shit.) Beside that, I do not know much about
Tcl, but several weeks before starting this project,
I stumbled over
Lua, a simple and
well documented script language designed and implemented by a team at Tecgraf,
PUC-Rio, Brazil. The initial intention was, to use Lua as a script language
for programming Ethernut applications. I still have no idea, if this is
possible,
but Lua would also make a good replacement for Tcl as a configuration language.
Nevertheless, the eCos configuration tool is great and exactly what I had been looking for. Within a few days, all the Tcl stuff had been removed. Some days later, the Lua interpreter had been included. Several weeks later the code started working somehow. Bugs had been fixed mainly by throwing things out. As a result, we have code, which is working in most parts, but lost many of its original features. Some are not useful for Nut/OS, others may be re-implemented again later. After having prepared the skeleton, we now hope that more developers will jump in. Of course, I'm aware, that most embedded system developers are not interested in GUI programming. Anyway, if you think this is something for you, please subscribe to the En-Nut-Discussion mailing list to contact us.
Download
The configuration tool is included in the Nut/OS 3.9.9, which is available in the download section.
For insiders: Get the latest development version from CVS HEAD.
Nut/OS Configuration
When creating a Win32 shortcut, make sure to set the working directory to the parent directory of your Nut/OS installation. If you installed Nut/OS in c:\ethernut\nut, then c:\ethernut is the perfect working directory. Or open a DOS window, change to the parent directory and enter nutconf.
When started, a file selection dialog is presented. Navigate to the nut/conf directory, where you should have copied the script files, select the configuration file for your board and press Open. On my German W2K installation, it looks like this.

Here's the same dialog running on Linux:
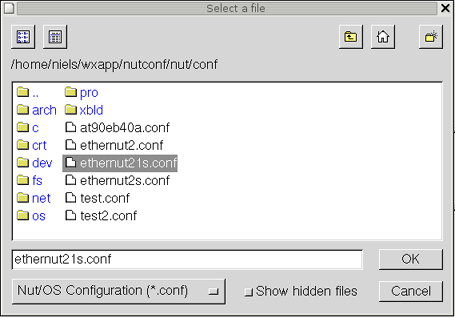
If you are using an original Ethernut board, then select
- ethernut13f.conf
for board versions 1.3 Rev-F or previous. - ethernut13g.conf
for board versions 1.3 Rev-G. - ethernut21b.conf
for board versions 2.0 Rev-A or Ethernut 2.1 Rev-B.
- at91eb40a.conf
Next the main configuration window will receive the focus.

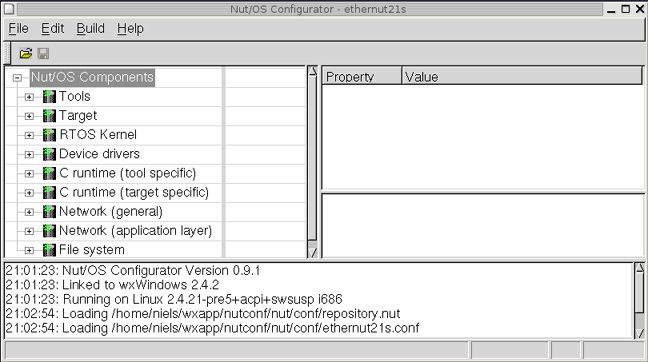
Sometimes the main window fails to display properly. Drag the window borders, so that the whole view looks similar to the one presented here. The tree on the left side will not be visible, that's still OK. Make sure, that the window part for the tree is large enough. Then terminate the configuration window and open it again. After opening the sample configuration, the tree should be visible. If not or if you completely messed things up, open your Win32 registry editor and remove the complete key at \HKEY_CURRENT_USER\Software\egnite\NutConf. Linux users may remove the hidden file .NutConf in the home directory. This will reset anything to its default.
Next we need to configure the local host environment. If you didn't follow the recommendations for subdirectories above, then the configuration utility may have failed to load the component repository. No big deal, we will configure everything right now. Select Edit/Settings from the main menu. The settings notebook will appear.

 The first page contains one item only, the path to the
so called repository file, name repository.nut. This
file contains the main Lua Script and defines the configuration
capabilities of the system. You may use the browse button to locate this file.
The first page contains one item only, the path to the
so called repository file, name repository.nut. This
file contains the main Lua Script and defines the configuration
capabilities of the system. You may use the browse button to locate this file.
 Let's have a look to the second settings page by clicking on the Build tab.
The source directory should be the one where you installed the Nut/OS
source code. The configuration utility will scan this directory for
files with basename Makedefs and use the file extension as a platform
identifier and add them to the Platform drop down list. Select
- avr-gcc
when using the GNU Compiler Collection for AVR. - arm-gcc
when using the GNU Compiler Collection for ARM. Very limited. The EB40A had been tested, but doesn't provide network capabilities. And the S3C45 implementation should work, but may not when using the configurator. - avr-icc
when using the ImageCraft Compiler for AVR. - h8-gcc
when using the GNU Compiler Collection for H8/300. Highly experimental! - linux-gcc
when using the GNU Compiler Collection to create a Linux based emulation of Nut/OS. This generally works, but has not been tested with the configurator yet.
 The entries for first and last include directories can be ignored for
GCC. They may used to set specific include directories, which will
be searched before (First) or after (Last) the standard directories
in the source tree. When compiling with ImageCraft, then set Last
to the ImageCraft include directory (e.g. c:/icc/include).
The entries for first and last include directories can be ignored for
GCC. They may used to set specific include directories, which will
be searched before (First) or after (Last) the standard directories
in the source tree. When compiling with ImageCraft, then set Last
to the ImageCraft include directory (e.g. c:/icc/include).
Usually the configurator will set the first directory to the include subdirectory in the build tree, if this entry had been left empty. Thus, if you add any special path, you may have to add the include dir of the build tree too.
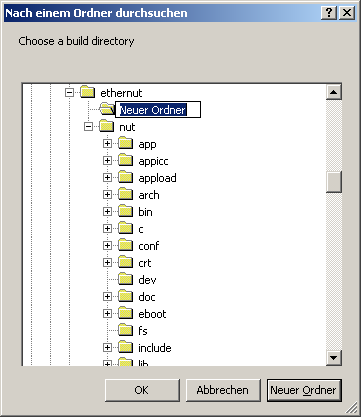
If you are familiar with rebuilding previous Nut/OS releases, you will notice a significant change in this new release. Now we distinguish between the source directory and the build directory.
The big advantage is, that in most cases the source directory will not require any changes. The configuration tool will create all configuration dependant files in the build directory. And this is also the directory, where the Makefiles are placed and executed and the final binaries are created. By changing the build directory, you are able to create different build environments from the same source tree. Or you may select different source trees as well.
Note, that pressing the browse button allows you to create new directories.
The last item on this page specifies the directory, where the resulting Nut/OS libraries will be installed. ImageCraft users should set this to the ImageCraft library path (e.g. c:/icc/lib). For GCC it is a good idea to keep the libraries within the build tree.
 On the third page of the settings notebook we specify the paths of the tools
to use. Nut/OS comes with its own set of tools located in tools/win32 and
tools/linux. This path should be first, followed by one or more paths
required by the compiler. Add
On the third page of the settings notebook we specify the paths of the tools
to use. Nut/OS comes with its own set of tools located in tools/win32 and
tools/linux. This path should be first, followed by one or more paths
required by the compiler. Add
- bin;utils/bin;
of the WinAVR installation directory when using WinAVR. - bin;
of the ICCAVR installation directory when using ImageCraft for AVR. - usr\local\bin;usr\bin;bin;gnutools\arm-elf\bin
of the Cygwin installation directory when running GCC for ARM in the Win32 Cygwin environment.
 Entries on the last page of the settings notebook are used to create
a sample application directory. Nut/OS comes with
a few samples,
which demonstrate its capabilities. The configurator can create a new directory
for you, copying the sources from the source tree and creating templates
for the Makefiles. Such a directory is also quite usefull when writing
your own Nut/OS applications.
Entries on the last page of the settings notebook are used to create
a sample application directory. Nut/OS comes with
a few samples,
which demonstrate its capabilities. The configurator can create a new directory
for you, copying the sources from the source tree and creating templates
for the Makefiles. Such a directory is also quite usefull when writing
your own Nut/OS applications.
ImageCraft users do not need to specify and create an application directory.
Instead they can directly load prepared ICCAVR projects in the appicc
directory into the IDE and use the build-in programmer.
When using GCC, you may select programmer too. This is quite useful,
because applications may be build and uploaded to the target board in
one go with make burn.
When done with the settings dialog, press OK. The settings will be stored in the Windows registry or a configuration file in the Linux home directory. In case you changed the repository file, you need to stop and restart the configurator now.
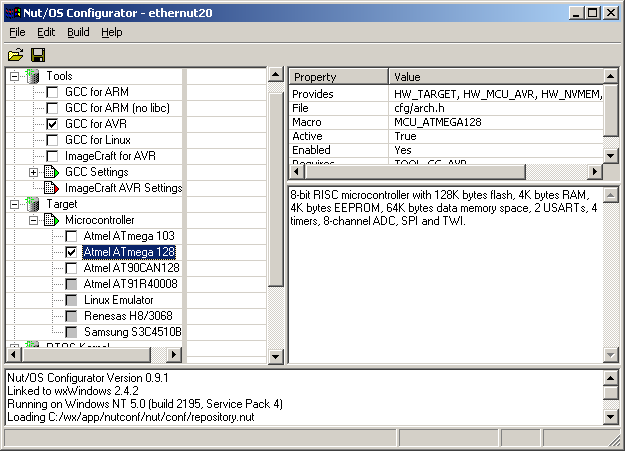
Hopefully you can finally see the full component tree in the main window. When using standard Ethernut boards and loading the related configuration, you won't need to change any settings in the component tree except selecting the correct compiler under Tools. You may then skip the rest of this chapter and move forward to build the Nut/OS libraries.
Currently there are four different types of components.
- Repository root
This is the top component. - Libraries
As you may already know, Nut/OS is not a big block. Instead it consists of a number of libraries, which will be linked to the application code. All library components are children of the root component. - Modules
Libraries are collections of modules. A module is the smallest block, which will be linked to your application code. In other words, as soon as your application references a single routine or variable of a module, the whole code of this module will be added to the final binary. However, there is a slight difference between configuration modules and real source code modules. Configuration modules may refer to multiple source code modules or to no source code module at all. But in general they are closely related. - Options
These are the bottom level component, which represent configurable items. Note, that not every module may contain options. In fact, this preview is quite incomplete here. We will later see, how to create your own option components.
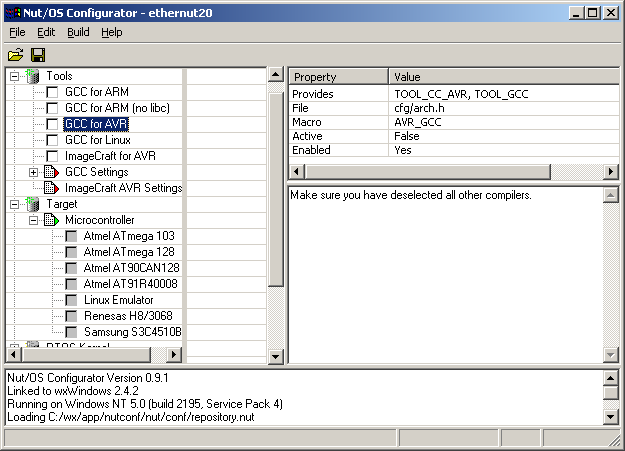
The first library module is named nutarch and is something special. Right now, it doesn't represent a real library. Thus, the underlying modules don't represent source code modules neither. The purpose of this tree branch is to offer some general options, which influence all other components. If you look to the previous screenshot, you will notice, that the microcontroller, which is typically selected after loading a configuration file, had been deselected. As a result, all other libraries are greyed out, because they are disabled. If you select any CPU, they will be at least partly re-enabled.
Furthermore, modules and options may be disabled or enabled depending on specific options being activated or deactivated. Such dependencies are defined in the Lua configuration scripts.
Options, which the user can activate or deactivate are called boolean options. You can change their state by clicking on the check box. Other options and even some boolean options do have values. You can change the option value by clicking into the second column of the component tree.
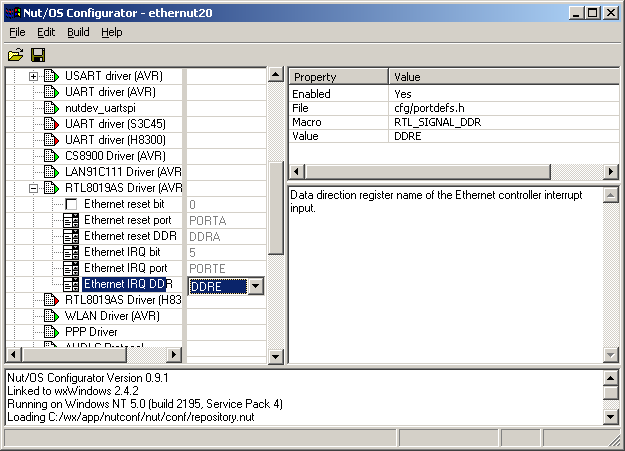
The property window on the upper right shows the value and some other interesting information about the currently selected option. These properties are used when finally creating the build directory.
Building Nut/OS Libraries
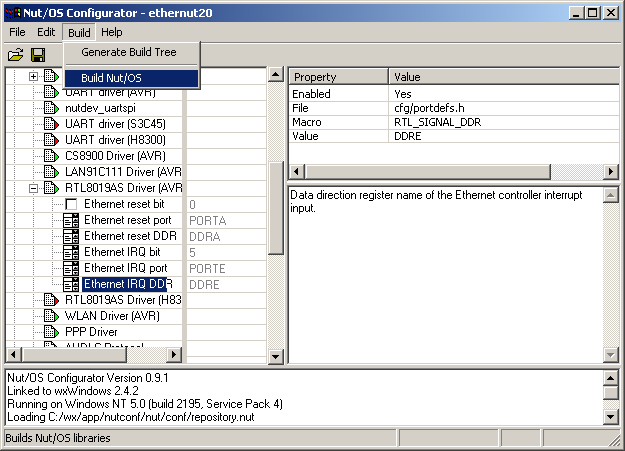

Select Build/Generate Build Tree on the main menu. After confirming the
message box, the configuration tool creates a new directory or modifies an
already existing one, using the build path specified in the settings dialog.
It creates all required Makefiles and, most important, it also creates some C
language header files in the the cfg subdirectory. These files are included
into the Nut/OS source code to tailor the system to a specific hardware.
Next select Build/Build Nut/OS on the main menu. The configurator will
now call the make utility to clean any previous build in the current
build tree and create new Nut/OS libraries in the install directory
specified in the settings notebook.

If this step fails, then the best chance for detecting the problem is by doing it manually. Go to a shell prompt or DOS window, change to the build directory and type make clean first and then make install.
Creating a Directory for Nut/OS Applications
This step doesn't make much sense for ImageCraft users, who can simply load prepared projects contained in the appicc directory.
When selecting Build/Create Sample Directory on the main menu and confirming the information popup, the configurator will create a new or update an existing directory for application development and fill in a few ready-to-run samples. It is recommended to use these samples as templates for your own projects.
 ETHERNUT 1.x NOTE
When creating a new directory, then the configurator will also create the
required file UserConf.mk. Nut/OS AVR libraries are always build for both
Ethernet Controllers, the Realtek 8019AS and the SMSC LAN91C111. However,
applications need to register the correct device and typically check,
wether ETHERNUT2 is defined or not. Newly created UserConf.mk files
define this item for Ethernut 2.x applications by default. Use any text
editor and delete HWDEF line in that file before building your applications.
Under the Hood
As described above, the Nut/OS configuration is based on two main items, the component repository and configuration. Both are specified by Lua scripts, which are not yet fully using the language and the resulting capabilites. Right now the usage is limited to filling Lua variables, which are then retrieved by the configuration tool.
The repository consists of several files. The main file is named repository.nut by default and specifies additional files to be included. All these files are located in the conf directory.
The second group of files specify option values. Again written in Lua, each file contains option settings for a specific target hardware. The file ethernut2.conf serves as a simple example. Users may load this file as a template, modify certain values and store the new configuration in a new configuration file. It is expected, that hardware vendors will provide ready to use Nut/OS configurations.
As you can see in the .conf files, configurations look quite simple. They can be limited to the old name=value scheme. In fact, the repository scripts are not that difficult either. They just add some kind of structure by using Lua arrays. They may look a bit weird first, because Lua recognizes two types of array indices, enumerated and named. It is always a good idea, to look into the Lua language definition and try a few samples using a ready build Lua interpreter.
The following table lists all named array indices known by the Configurator.
| Keyword | Description | Compo. | Option |
|---|---|---|---|
name |
Unique internal name of a component. | Yes | No |
macro |
C macro name. This string is used for the #define statement in the header file. | No | Yes |
script |
Includes the specified configuration file. | Yes | No |
subdir |
Source code subdirectory. | Yes | No |
brief |
Brief description, displayed in the Configurator's component tree. | Yes | Yes |
description |
More detailed description. Provides additional information to the user. | Yes | Yes |
requires |
List of features required to enable this item. | Yes | Yes |
provides |
List of features provided by this item. | Yes | Yes |
options |
List of component options. | Yes | No |
active_if |
Not used. | ||
flavor |
Option flavor. Either boolean, data
or booldata. |
No | Yes |
type |
Option type. Either integer, bool
or enumerated |
No | Yes |
ctype |
Not used. | ||
file |
Name of the file to store the option. | No | Yes |
sources |
List of source file of this component. If the component is enabled, the specified files are added to the Makefile. | Yes | No |
targets |
Explicite target file. | Yes | No |
choices |
Available choices if the option type is enumerated |
No | Yes |
makedefs |
Items added to NutConf.mk. | No | Yes |
The Configurator's Source Code
First of all, care has been taken not to force everyone using a either a GUI or rewriting the whole thing. Actually no C++ code directly calls any Lua code. Instead, a C wrapper (did you know that such things exist?) protects C++ from Lua and vice versa. This way, it should be possible to create a simple command line tool written in C and re-use the interpreter interface as well as the parts which create the final build tree.
In any case, you need the Lua source code, which can be downloaded from the Lua download page. Version 5.02 was used for the configuration preview.
If you decided to build the GUI version, you need to download the wxWidget source code from here. While the Lua interpreter will compile almost immediately without problems, it may take some time to set all the required compile options for wxWidgets. Best try some samples included in the wxWidgets distribution before taking the big step to the Nut/OS configuration tool. If you fail, try to get help from the wxWidgets' mailing list on wxWidgets related items. Do not post wxWidgets related questions to the Nut/OS mailing list unless they are closely related to the configuration tool. The same applies for Lua related problems.
Building the Configurator on Linux
The following packages had been recently used to build the Configurator on Debian Linux
| Name | Version | Description |
|---|---|---|
| ethernut | 3.9.9 | Nut/OS source code from CVS head |
| gcc-3.3 | 3.3.4-13 | GNU C compiler |
| g++-3.3 | 3.3.4-13 | GNU C++ compiler |
| wxwin2.4-headers | 2.4.2.6 | wxWindows Cross-platform C++ GUI toolkit (header files) |
| libwxbase2.4 | 2.4.2.6 | wxBase library (runtime) - non-GUI support classes |
| libwxbase2.4-dev | 2.4.2.6 | wxBase library (development) - non-GUI support classes |
| libwxgtk2.4 | 2.4.2.6 | wxWindows Cross-platform C++ GUI toolkit (GTK+ runtime) |
| libwxgtk2.4-dev | 2.4.2.6 | wxWindows Cross-platform C++ GUI toolkit (GTK+ development) |
| lua50 | 5.0.2-5 | Lua 5.0 small embeddable language |
| liblua50 | 5.0.2-5 | Main interpreter library for the Lua 5.0 |
| liblua50-dev | 5.0.2-5 | Main interpreter library for Lua 5.0: Static library and headers |
| liblualib50 | 5.0.2-5 | Extension library for the Lua 5.0 programming language |
| liblualib50-dev | 5.0.2-5 | Extension library for Lua 5.0: Static library and headers |
Get the latests Nut/OS source code via anonymous CVS from SourceForge.
cvs -d:pserver:anonymous@cvs.sourceforge.net:/cvsroot/ethernut login
cvs -z3 -d:pserver:anonymous@cvs.sourceforge.net:/cvsroot/ethernut co nut
The wxWidgets (this is how wxWindows is called today) libraries for GTK+ are available in tar and rpm format at the wxWidgets website.
Lua rpms can be downloaded from rrt.sc3d.org. Or you can download source in gziped tar archives from the official Lua download page.
On Debian you can use
apt-get with the package names given in the table above.
They are part of the testing environment. If you are
running stable, make sure to include a proper entry in
/etc/apt/sources.list and use
apt-get -t testing libwxbase2.4
/etc/apt/preferences to pin the rest
of your system to stable. Check this
mailing list post for a more detailed explanation.
Debian's stable release is still at GCC version 2.95. So you have to mix with GCC 3.3 from the testing release as well. Neither wxWidgets nor Lua 5.0 will correctly compile with GCC 2.95.
If you need to keep your previous version of GCC beside 3.3, it may be sometimes difficult to force building with GCC 3.3. One way is to
export MAKEFLAGS="CXX=g++-3.3" "CC=gcc-3.3"
make versions
grep VERSION *.h *.c
nutconf.h:#define VERSION "1.1.1"
nutcomponent.c:#define NUT_CONFIGURE_VERSION   "1.1.1"
wx-config --version
2.4.2
gcc-3.3 --version
gcc-3.3 (GCC) 3.3.4 (Debian 1:3.3.4-13)
Copyright (C) 2003 Free Software Foundation, Inc.
This is free software; see the source for copying conditions.  There is NO
warranty; not even for MERCHANTABILITY or FITNESS FOR A PARTICULAR PURPOSE.

g++-3.3 --version
g++-3.3 (GCC) 3.3.4 (Debian 1:3.3.4-13)
Copyright (C) 2003 Free Software Foundation, Inc.
This is free software; see the source for copying conditions.  There is NO
warranty; not even for MERCHANTABILITY or FITNESS FOR A PARTICULAR PURPOSE.

lua -v
Lua 5.0.2  Copyright (C) 1994-2004 Tecgraf, PUC-Rio
Good luck!