
Porting Nut/OS for the GameBoy Advance
Introduction
This article explains the tasks to be done when porting Nut/OS to the GameBoy Advance. It can be used as an example of how to port Nut/OS to new hardware platforms. This project isn't finished.
The GameBoy hardware is based on an ARM7 CPU. Additional hardware
is required to upload and run a Nut/OS application on the GBA.
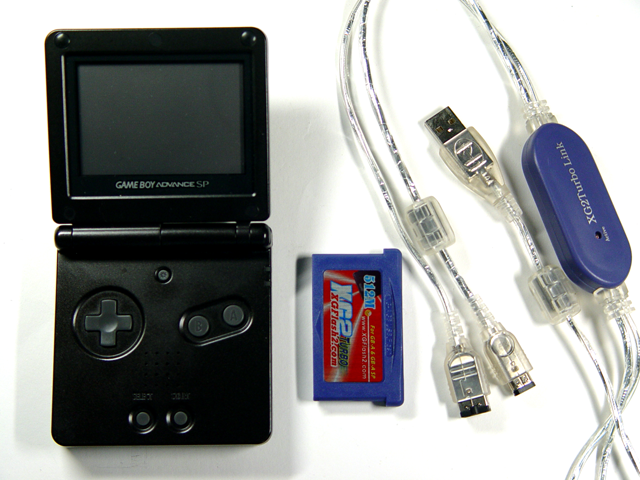
The XG2 Turbo Link with USB programming interface.
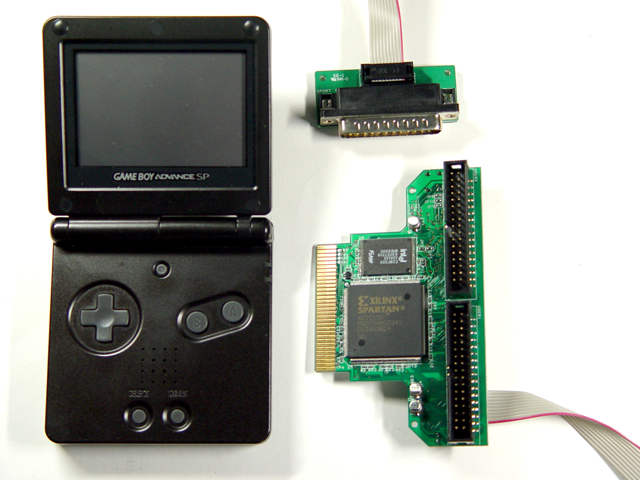
The Xport 2.0 with parallel port programming interface.
Step 1: Setting up a Build Environment
The build environment we use for the ARM7 CPU is based on the GNU toolchain and is available on Windows NT/2K/XP and Linux.
When using Windows, then the Cygwin environment should be installed first. It is available at www.cygwin.com. Cygwin is a UNIX emulator for Windows and for which a number of optional packages are available. Make sure to install at least gcc, make, wget sharutils and tcltk. When this installation had been done, you can install the GCC toolchain. Fortunately a pre-build one is available from ecos.sourceware.org.
Step 2: Adapting the Nut/OS Configurator
The Nut/OS Configurator is controlled by Lua Scripts, which allow to adapt it to different platform requirements. If you can't follow the each detail in this chapter, don't worry. The Configurator is a very new tool and has already seen many changes. It's still inconsistent in many parts and the scripting part is almost undocumented yet. When adding new hardware, the best way is to use copy and paste as well as trial and error. Fortunately the ARM7 CPU is already supported and not many changes are required to add GBA support. A lot more effort would be needed when using a completely different CPU,
The main script file is conf/repository.nut, which mainly contains a few global values and several definitions to include additional script files. The only required change in this file is to add another choice for the GCC linker.
arm_ld_choice = { "s3c4510b-ram", "eb40a_ram", "gbaxport2" }gbaxport2 to reflect its usage
with the GBA including the XPort 2 hardware.
The Lua array arm_ld_choice is used in the script
conf/tools.nut, specifically in the makedefs part
of the the component ARM_LDSCRIPT
  {
      macro = "ARM_LDSCRIPT",
      brief = "ARM Linker Script",
      description = "s3c4510b-ram Samsung S3C4510B, code in RAM\n"..
                    "eb40a_ram Atmel AT91R40008, code in RAM at 0x100\n"..
                    "gba_xport2 Gameboy Advance with XPort 2\n",
      requires = { "TOOL_CC_ARM", "TOOL_GCC" },
      flavor = "booldata",
      type = "enumerated",
      choices = arm_ld_choice,
      makedefs =
      {
          "LDNAME",
          "LDSCRIPT=$(top_srcdir)/arch/arm/ldscripts/$(LDNAME).ld"
      }
}makedefs part will create two lines in the
file NutConf.mk.
  LDNAME=gbaxport2
  LDSCRIPT=$(top_srcdir)/arch/arm/ldscripts/$(LDNAME).ld
OBJ1 = arm/init/crt$(LDNAME).o
  {
      name = "nutarch_cstartup_arm",
      brief = "ARM-GCC Startup",
      sources = { "arm/init/crt$(LDNAME).S" },
      targets = { "arm/init/crt$(LDNAME).o" },
      requires = { "TOOL_CC_ARM" },
}nutarch_mcu requires
a new entry to reflect the properties of the ARM7 CPU used in
the GameBoy Advance.
  {
      macro = "MCU_GBA",
      brief = "Nintendo GBA",
      description = "ARM7TDMI 16/32-bit RISC microcontroller",
      flavor = "boolean",
      file = "include/cfg/arch.h",
      requires = { "TOOL_CC_ARM" },
      provides = {
          "HW_TARGET",
          "HW_MCU_GBA",
          "HW_TIMER_GBA",
          "HW_LCD_GBA"
      },
      makedefs = { "MCU=arm7tdmi" }
}provides, which
tells the configurator:
- This platform offers a hardware target. OK, this is quite obvious, but required. As long as no component providing a HW_TARGET is enabled, most Nut/OS components are disabled.
- This platform is of type MCU_GBA. This item may be used to enable other components specifically written for the GameBoy.
- This platform provides a hardware timer of type TIMER_GBA. Again this can be used to enable other hardware specific components.
- This platform provides an LCD screen of the type LCD_GBA. This enables the GBA LCD driver, which we will have to write later.
  {
      name = "nutdev_debug_gba",
      brief = "LCD Debug Output (GBA)",
      requires = { "HW_LCD_GBA" },
      provides = { "DEV_FILE", "DEV_WRITE" },
      sources = { "debug_gba.c" }
}DEV_FILE and DEV_WRITE
for the uppper layers of the Nut/OS I/O System. For now we stick with
a simple debug output and thus name the source file debug_gba.c. In
the next chapter we will take a close look to this device driver.
Step 3: C Runtime Initialization
Unfortunately something really complicated has to be done first. Doing a C runtime initialization from scratch requires some in depth knowledge of the C compiler and the target hardware. Generally it consists of two files, an assembler routine and a linker script. According to our configuration done in the last step, the assembler routine will go to a file named arch/arm/init/crtgbaxport2.S and the linker script is arch/arm/ldscripts/gbaxport2.ld.
Fortunately there are many more or less complicated sources available for most platforms. Actually nothing special has to be done for Nut/OS except the naming of some items. Thus we can use an exisiting source with a few modifications.
__heap_startneeds to be defined in the linker script to define the end of the bss. Nut/OS needs this address for the beginning of heap memory.- Instead of jumping to
main(), the runtime initialization should callNutInit(). As shown in the AVR port, this is not really required, but it's much cleaner than redefiningmain()during compilation and possibly confusing some debuggers.
Step 4: Creating an output device
It is a good idea to implement some kind of simple output first, which allows us to do display some debug output while porting other parts. On most hardware platforms with UART hardware this is quite simple. Just make a copy of an exisiting debug driver source code and replace the hardware speicifc parts.
On the GBA this is different. Actually there is something like an UART device inside, but it's not available without additional hardware. The LCD would make a perfect output device, but creating a driver is a bit more complicated. Fortunately there are several resources available in the Web to learn from.
The name of the source file had been specified in the previous chapter as debug_gba.c and should be located in subdirectory dev of the Nut/OS source tree.
The first part of every Nut/OS driver is the NUTDEVICE structure.
  NUTDEVICE devDebug0 = {
      0,                          /*!< Pointer to next device, dev_next. */
      {'c', 'o', 'n', 0, 0, 0, 0, 0, 0},      /*!< Unique device name, dev_name. */
      0,                          /*!< Type of device, dev_type. */
      0,                          /*!< Base address, dev_base. */
      0,                          /*!< First interrupt number, dev_irq. */
      0,                          /*!< Interface control block, dev_icb. */
      0,                          /*!< Driver control block, dev_dcb. */
      DebugInit,                  /*!< Driver initialization routine, dev_init. */
      DebugIOCtl,                 /*!< Driver specific control function, dev_ioctl. */
      0,                          /*!< dev_read. */
      DebugWrite,                 /*!< dev_write. */
      DebugOpen,                  /*!< dev_opem. */
      DebugClose,                 /*!< dev_close. */
      0                           /*!< dev_size. */
};#include <dev/debug.h> NutRegisterDevice(&devDebug0, 0, 0);
For our simple debug output device, most entries in the NUTDEVICE structure are unused. The remaining are
DebugInit: Called during device registration to initialize the hardware. Some code is required to switch the GBA to the proper LCD mode and to load a character font.DebugIOCtl: Used by the application to set device specific parameters like baudrate, data format etc. To keep things simple, our routine may always return -1. This tells the application that this function is not supported.DebugWrite: This will be called by the I/O system for sending its output to the device. For LCD screens we have to keep track of the cursor position.DebugOpenandDebugClose: Just a simple adaption to the Nut/OS file system. Nothing exciting is done here for our debug device.
If available, testing and debugging of the device driver may be done with a standard runtime initialization and linker script. Nut/OS is not required yet. Just compile a simple source file with a main entry and the routines under test.
Step 5: Building Nut/OS Partly
The device driver created in the previous step will be most helpful with the Nut/OS standard I/O routines. Note, that we didn't touch any of the hardware specific core routines yet, which will finally make the port complete:
- Context switching
- Timer handling
- Other device drivers
We will use the Configurator to create a build tree and try to compile
it. Because of DEV_FILE and DEV_WRITE provided
by LCD driver, all required components for debug output will be
included in the build process and the resulting libraries should
be sufficient for our first Nut/OS application running on the GBA.
We can also use the Configurator to create a sample directory with proper makefiles. Of course we won't be able to compile any of the sample applications with our minimal system. We will create some kind of dummy application in a new subdirectory within the sample tree.
Because we cannot compile nutinit.c without context switching support,
we skip this and replace main() by NutInit()
in our application code. Because nutinit.c will also initialize the
heap and because heap memory is required by the standard I/O library,
we will do this in our application code as well. Here it is:
#include#include #include #include #include char lheap[4096]; FILE *con; /* * GBA console sample. */ int main(void) { int i; NutHeapAdd(lheap, sizeof(lheap)); NutRegisterDevice(&devDebug0, 0, 0); con = fopen("con", "w"); for (i = 0;; i++) { fprintf(con, "Hello world %d!\n", i); } }
  PROJ = gbatest

  include ../Makedefs

  SRCS =  $(PROJ).c
  OBJS =  $(SRCS:.c=.o)
  LIBS =  -lnutos -lnutdev -lnutos -lnutcrt
  TARG =  $(PROJ).hex

  all: $(OBJS) $(TARG)

  include ../Makerules

  upload: $(PROJ).elf
        arm-elf-objcopy -v -O binary $(PROJ).elf $(PROJ).bin
        xpcomm $(PROJ).bin

  clean:
        -rm -f $(OBJS)
        -rm -f $(TARG)
        -rm -f $(SRCS:.c=.lst)
The xpcomm utility comes with the XPort2 and used to upload the binary code to the target.
Where to go from here?
The GBA port hasn't been finished yet. Timer interrupt handling will be next. It is very hardware specific. Hopefully context switching doesn't seem to be much work, if any at all. It had been done for the AT91 already, which is an ARM7 as well. When this has been done, the real fun starts. One next device driver will be for the Ericsson chat keyboard, which had been already attached to my GBA.
TImer and Thread Sample
Here's a simple application, which uses two core functions of the kernel, timer and multithreading.
  #include <stdio.h>
  #include <sys/version.h>
  #include <sys/heap.h>
  #include <sys/timer.h>
  #include <sys/thread.h>

  #include <dev/debug.h>

  THREAD(Back, arg)
  {
      for(;;) {
          NutSleep(1000);
          putchar('\n');
      }
  }

  int main(void)
  {
      int i;

      NutRegisterDevice(&devDebug0, 0, 0);
      freopen("con", "w", stdout);
      printf("Nut/OS %s on GBA\n", NutVersionString());

      printf("%lu bytes free\n", NutHeapAvailable());

      NutThreadCreate("back", Back, 0, 4096);

      for (i = 1;; i++) {
          printf("\r%6ld ms", NutGetMillis());
          NutSleep(100);
      }
  }
Uploading the binary to the GameBoy.

XG2 Linker start menu.
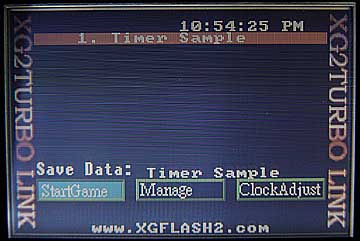
Select the Nut/OS application.

Sample application running.