AT91SAM Internet Radio
This document describes, how to implement a SHOUTcast Internet Radio on the AT91SAM9260 and AT91SAM7X256 Evaluation Kits.
Atmel published a related application note, which is available at www.atmel.com/dyn/products/app_notes.asp?family_id=605
Licenses

The radio application code is published under The BSD License . Nut/OS is derived from many sources. However, all releated licenses are compatible with the BSD License and all Nut/OS specific modifications are published under this license as well. Specifically no firmware code is included, which license prohibits the further distribution of binaries without accompanying source code. This includes the C standard library newlib .
As an exeception of the above rule, the Helix MP3 Decoder comes with a different license. Carefully read the Helix License Page .
The tools that are used to build the firmware are licensed under The GNU General Public License (GPL) . Note, that the final firmware will not contain any GPL'ed code.
Requirements
In order to run the binary package, the following items are needed:
-
Target hardware is Atmel's AT91SAM9260 Evaluation Kit. A quite limited version runs on the AT91SAM7X256-EK as well.
-
An add-on board had been designed, which is named Calypso and fits on both kits. It contains a TLV320AIC23B Audio Codec, an LC Display, three push buttons and two 3.5mm audio connectors, providing mic/line input and headphone/line output. This application will use the output connector only.
-
A PC running Windows is used as the development environment. It must provide a USB port, an additional serial comm port (RS232) will be quite helpful.
-
The SAM9260 MCU contains a bootloader (called SAM-BA) in internal ROM. Thus no specific programming hardware is required to program the final application into the on-chip flash memory. We used the SAM-BA v2.4 utility, which can be downloaded free of charge from Atmel's Website .
-
Download the binary installation at91samir-bin-1.0.3-1.exe. Simply run this executable to install the binaries on your Windows PC.
If you want the build the firmware from the source code, you additionally need these items:
-
Download the latest Nut/OS release 4.4 for the Windows environment from the archive. In the same location you will find the Internet Radio application source. The name of the archive is at91samir-src-1.0.3.zip.
-
The Nut/OS package comes with all required tools except the compiler. There are several free distributions of the GNU Toolchain for ARM. If you are using PC Windows, then YAGARTO will be a good choice. This is a free distributions of the GNU Compiler for ARM, which we also used for this document.
Using Linux
While Nut/OS is available as a source code package for Linux, we do not know
which tools are available to replace SAM-BA. A possible solution might be
provided by
SAM_I_AM
.
Memory Footprint
While the ARM9 version uses very large buffers to maintain constant streaming, the data buffers had been significantly reduced for the ARM7 implementation. Furthermore, the ARM7 version comes without web server interface.
| AT91SAM9260 | AT91SAM7X | |
|---|---|---|
| Program Code | 128 kByte | 98 kByte |
| Data Space | 1 MByte | 64 kByte |
SAM9260 Implementation
Hardware Installation
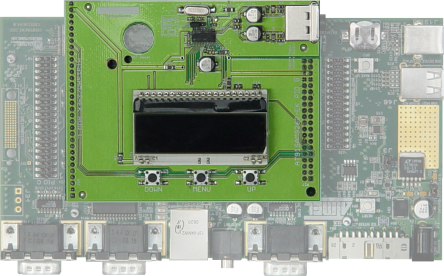
All connectors should be removed from the AT91SAM9260-EK Board. Plug the double row header socket of the Calypso Board on the PIO B header of the AT91SAM9260-EK. Make sure that all 40 pins are connected.
Trying the Binaries
For a first test we will upload the binary directly into the RAM. We will later explain how to store the application in non-volatile flash memory. It is assumed that you downloaded and installed at91samir-bin-1.0.3-1.exe.
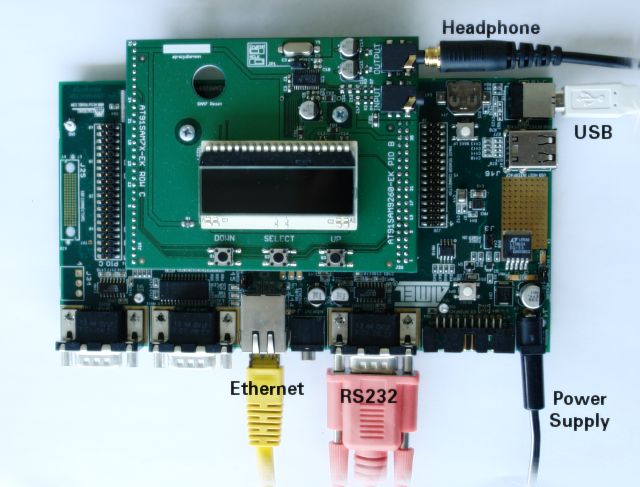
Connect the AT91SAM9260-EK to your local Ethernet, to your PC's USB port and serial port (via the DBGU connector) and to the power supply. Also plug in a headphone.
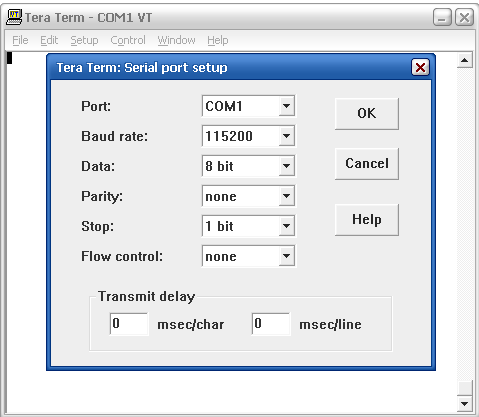
Start any terminal emulator (HyperTerminal or preferably TeraTerm , if available) and set the serial port to 115200,8,n,1, all handshakes disabled.
When applying 5V power to the AT91SAM9260-EK Board, the back-lit LCD will go on, but nothing will be displayed yet. You should see the following output from the SAM-BA bootloader in the terminal emulator:
RomBOOT
>
Start the SAM-BA v2.4 utility on the PC and click on USB connection.
Click on the SDRAM Tab, select Enable SDRAM 133 MHz from the script drop down list and press the Execute button.
Press the Browse button (the one with the folder icon) to choose a file to send to the board.
Navigate to sub-directory firmware\sam9260 within the binary installation directory, where the file webradio.bin should be available. After the binary file had been selected, press the button Send File.
Finally enter
go 0x20000000in the text area on the bottom of the SAM-BA main window. This will start the application on the target board.
This ![]() Shockwave
Flash Tutorial presents this procedure step by step.
Shockwave
Flash Tutorial presents this procedure step by step.
The radio application will produce some output on the terminal emulator window. If your local network provides DHCP service, the radio will immediately try to connect a radio station:
SAM Internet Radio 1.0.3 - Nut/OS 4.4.0.1
66956191 bytes free
CPU Clock   : 90316800
Master Clock: 90316800
1000 system ticks/s
Register eth0...OK
Configure eth0...OK
IP Addr: 192.168.192.205
IP Mask: 255.255.255.0
IP Gate: 192.168.192.1
Start Responder...OK
Trying station entry 2
[RIDLE][PIDLE][CNCT 194.158.114.67:8000][CERR=10061]
Trying station entry 3
[CNCT 193.251.154.243:8000][CNCTD]ICY 200 OK
icy-notice1:<BR>This stream requires <a href="http://www.winamp.com/">Winamp</a><BR>
icy-notice2:SHOUTcast Distributed Network Audio Server/Linux v1.9.5<BR>
icy-name:FREQUENCE3 - www.frequence3.fr - No ads ! It's only HITS live from Paris
 France ! - French Webradio
icy-genre:Top 40 Dance Pop Rock
icy-url:http://www.frequence3.fr
content-type:audio/mpeg
icy-pub:1
icy-metaint:32768
icy-br:192

193.251.154.243 192kbps FREQUENCE3 - www.frequence3.fr - No ads ! It's only HITS
 live from Paris France ! - French Webradio Connected: 65881451 bytes free
[RSTOP][RSTART][REVT1][RRUN]
Meta='StreamTitle='Pink - Who knew';StreamUrl='';'
65883963 bytes free
[PSTOP][PSTART][PEVT1][PRUN]
Buffering......................................................................................
...............................................................................................
...............................................................................................
...............................................................................................
...............................................................................................
..........................................................................
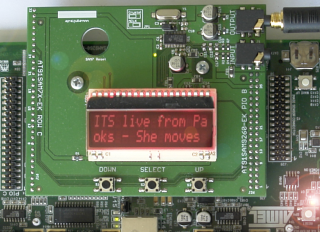
When enough MP3 data had been collected after a few seconds, you should be able to listen to the music on the headphones. The LCD starts scrolling the station name on the first line and the song currently played on the second line.
[SKIP 251]
[ERR-2] 65859803 bytes free
[SKIP 625]
Bitrate    : 192000
Channels   : 2
Sample rate: 44100
Bits/sample: 16
Samples    : 2304
Layer      : 3
Version    : 0

Meta='StreamTitle='A suivre: Depeche Mode - Precious';StreamUrl='';'
65712743 bytes free

Meta='StreamTitle='Pink - Who knew';StreamUrl='';'
65712411 bytes free

Meta='StreamTitle='Depeche Mode - Precious';StreamUrl='';'
65710783 bytes free

Meta='StreamTitle='A suivre: R.E.M. - Shiny happy people';StreamUrl='';'
65710523 bytes free
Don't worry if your radio fails to connect to a radio station. The next chapter will probably help.
Network Configuration
When running out of the box, the application will query its IP configuration from a local DHCP server, if one is available. If not, some hard coded values are used. You can later modify them in the file webradio.c.
/*
 * Unique IP address of the Ethernut Board.
 *
 * Ignored if DHCP is used.
 */
#define MY_IPADDR "192.168.192.35"

/*
 * IP network mask of the Ethernut Board.
 *
 * Ignored if DHCP is used.
 */
#define MY_IPMASK "255.255.255.0"

/*
 * Gateway IP address for the Ethernut Board.
 *
 * Ignored if DHCP is used.
 */
#define MY_IPGATE "192.168.192.1"
Changing the code requires rebuilding the application. An easier way is available with the Nut/OS Discoverer, which is part of the binary installation. You can start it from the Windows Start Menu at Start -> Programs -> AT91SAM Internet Radio Binaries -> Nut/OS Discoverer

Selecting Scan from the main menu will broadcast a query for Nut/OS nodes to the local network and the Internet Radio should respond with its IP setting.
Double click on the entry in the Discoverer's main window. This pops up a new window, which allows you to edit the current settings.
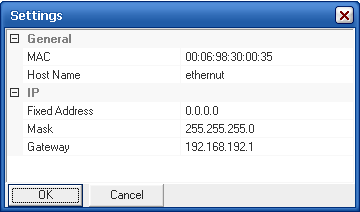
When updating the target board, the new settings will be stored in the serial DataFlash, but are not immediately available. It is required to reset the target board and start the application again. Up to now we loaded the the binary directly into the RAM and it will be lost when pressing the reset button.
Running SAM-BA over and over again to upload and start the application may become boring soon. The next chapter will explain, how to permanently store the application on your evaluation board.
Flashing the SAM9 Evaluation Board
Beside loading a binary into the SDRAM, SAM-BA also allows to store binaries in the serial Dataflash or the NAND Flash. And, if a valid image is detected in the serial Dataflash after reset, the ROM Bootloader will copy it to ... what?
Well, this is where things are becoming a bit complicated. Note, that the ROM bootloader is located in the non-reprogrammable ROM of the AT91SAM9260 chip. Of course this has to be universal and does not know anything about external RAMs, specifically SDRAM configurations. Fortunately it knows about the two internal 4k RAM pages. They are far too small for our radio, but large enough to run a second stage boot loader, which can be crafted for our specific RAM layout.
Thanks to Atmel France for providing two second stage boot loaders for our Internet Radio. You may have noticed those two additional files, that are available in the directory firmware\sam9260.
-
Web_Radio_dataflash_at91sam9260ek.bin
This one loads 512 kBytes from DataFlash location 0x8000 to address 0x20000000 (SDRAM). -
Web_Radio_nandflash_at91sam9260ek.bin
The second binary loads 512 kBytes from address 0x20000 (NAND Flash) to address 0x20000000 (SDRAM).
Before copying the image, these second stage boot loaders also initialize the DBGU port, the PLLA and the SDRAM interface.
Let's start SAM-BA and on the first notebook page titled DataFlash AT45DB/DCB execute the scripts
-
Enable DataFlash on CS1
-
Send Boot File
Use Web_Radio_dataflash_at91sam9260ek.bin as the boot file to be sent. Then send the file webradio.bin, but do not forget to set the upload address to 0x8000. When the file has been send, press the reset button on the target board to start the radio.
A similar procedure can be used to load the radio application from NAND Flash. This time select the NandFlash tab and execute the scripts
-
NandFlash Init
-
NandFlash Send Boot File
Choose Web_Radio_nandflash_at91sam9260ek.bin for the boot file. Then send the application binary (using button "Send File") to address 0x20000.
One ![]() Shockwave
Flash Animation demonstrates how to setup the SAM9260-EK for
booting the radio application from serial DataFlash and a
Shockwave
Flash Animation demonstrates how to setup the SAM9260-EK for
booting the radio application from serial DataFlash and a
![]() second
animation shows how to prepare the NAND Flash for booting the
radio.
second
animation shows how to prepare the NAND Flash for booting the
radio.
Recovering
Once a boot file had been stored in any of the Flash memory chips, SAM-BA
connections are no more available. Keeping push button BP4 pressend on the
SAM9260-EK while powering up the board will remove the boot file and re-enable
SAM-BA on the next reset.
Using the Web Interface
The radio application provides a very simple web interface. Use any webbrowser to connect to the target board, by entering http:// followed by the IP address as a URL. The current IP address is displayed in the terminal emulater. Or you can use the Nut/OS Discoverer, of course.
Development Software Installation
The following steps are required, if you want to build the binaries from the source code.
Step 1: Downloading and installing YAGARTO
If not already done, download at least the YAGARTO toolchain and the YAGARTO tools from www.yagarto.de and install them on your Windows PC. You may also consider to install OpenOCD and the Eclipse IDE from the same webpage.
Step 2: Downloading and installing SAM-BA
We will use SAM-BA Version 2.4 to upload the application to the target board. This tool is available free of charge from www.atmel.com (select Products / AT91SAM 32-bit ARM-based Microcontrollers / Tools & Software).
Step 3: Downloading and installing Nut/OS
For our radio we need version 4.4 or any later release, available in our download area.
You can view a ![]() Shockwave
Flash Demo of the installation.
Shockwave
Flash Demo of the installation.
Step 4: Downloading and installing the SAM Internet Radio Application
The Zip Archive at91samir-src-1.0.3.zip contains the source code of the radio application and the MP3 decoder plus some Nut/OS configuration files. Extract the file into the Nut/OS installation directory, that had been created in step 2.
A ![]() Shockwave
Flash Demo shows how to do this with the help of
7-Zip
.
Shockwave
Flash Demo shows how to do this with the help of
7-Zip
.
The resulting directory structure is shown below.
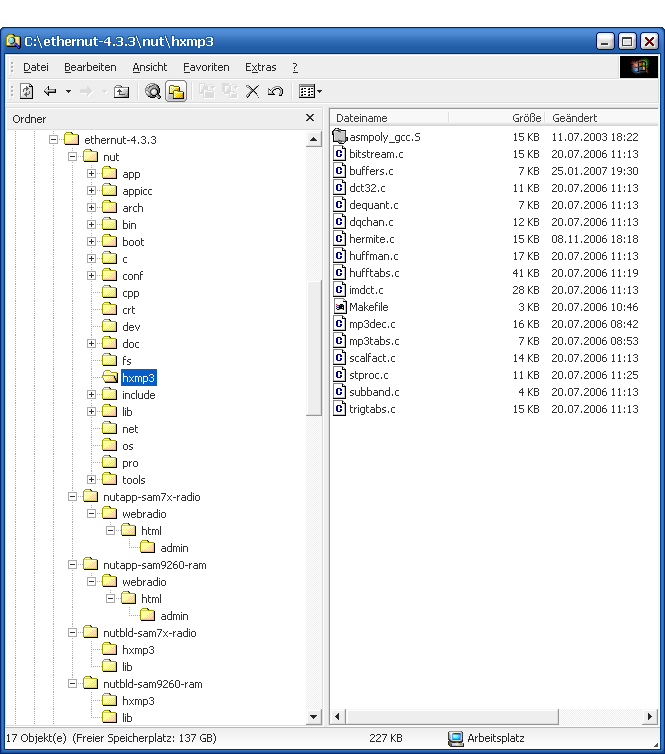
As you can see from the screenshot, the Helix MP3 Decoder had been added to the Nut/OS source tree. Further two new application directories and two new build directories had been added, one of each for the SAM7X and the other for the SAM9260.
Nut/OS Configuration
This ![]() Shockwave Flash Tutorial will guide you through the whole
procedure of creating the Nut/OS libraries for our radio. It is a good idea to
start the Nut/OS Configurator from the Windows Start Menu now and follow the
demo step by step.
Shockwave Flash Tutorial will guide you through the whole
procedure of creating the Nut/OS libraries for our radio. It is a good idea to
start the Nut/OS Configurator from the Windows Start Menu now and follow the
demo step by step.
More details about configuring and building Nut/OS for the SAM9260 are explained in the document Nut/OS on the AT91SAM9260 EK. When following the instruction on this page, make sure the use ethernut-4.4.exe or any later realease and select the configuration file at91sam9260-ek-radio.conf.
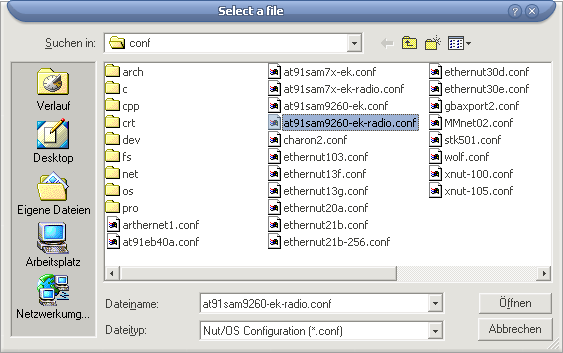
Choose nutbld-sam9260-ram\ for the build tree and nutapp-sam9260-ram\ as the application (sample) directory.
Building the Software MP3 Decoder Library
Open a command line window (aka DOS Box) and change to the Helix Decoder subdirectory within your build tree. This directory contains just a Makefile, which compiles the Helix Source Code in the Nut/OS source tree and copies the resulting library in the lib/ subdirectory of this build tree when entering 'make install'. However, make sure your PATH environment is correctly set. The following command sequence can be used with YAGARTO, running on a German Windows 2000 installation.
cd C:\ethernut-4.4.0\nutbld-sam9260-ram\hxmp3
SET PATH=C:\ethernut-4.4.0\nut\tools\win32;C:\Programme\yagarto\bin;%PATH%
make install
The following output is expected:
arm-elf-gcc -c -mcpu=arm9 -Os -mthumb-interwork -fomit-frame-pointer -Wall -Werror -Wstrict-prototypes
  -Wa,-ahlms=mp3dec.lst -DAT91SAM9260_EK   -I../include  -I../../nut/include  ../../nut/hxmp3/mp3dec.c -o mp3dec.o
arm-elf-gcc -c -mcpu=arm9 -Os -mthumb-interwork -fomit-frame-pointer -Wall -Werror -Wstrict-prototypes
  -Wa,-ahlms=mp3tabs.lst -DAT91SAM9260_EK   -I../include  -I../../nut/include  ../../nut/hxmp3/mp3tabs.c -o mp3tabs.o
arm-elf-gcc -c -mcpu=arm9 -Os -mthumb-interwork -fomit-frame-pointer -Wall -Werror -Wstrict-prototypes
  -Wa,-ahlms=buffers.lst -DAT91SAM9260_EK   -I../include  -I../../nut/include  ../../nut/hxmp3/buffers.c -o buffers.o
arm-elf-gcc -c -mcpu=arm9 -Os -mthumb-interwork -fomit-frame-pointer -Wall -Werror -Wstrict-prototypes
  -Wa,-ahlms=bitstream.lst -DAT91SAM9260_EK   -I../include  -I../../nut/include  ../../nut/hxmp3/bitstream.c -o
  bitstream.o
arm-elf-gcc -c -mcpu=arm9 -Os -mthumb-interwork -fomit-frame-pointer -Wall -Werror -Wstrict-prototypes
  -Wa,-ahlms=dct32.lst -DAT91SAM9260_EK   -I../include  -I../../nut/include  ../../nut/hxmp3/dct32.c -o dct32.o
arm-elf-gcc -c -mcpu=arm9 -Os -mthumb-interwork -fomit-frame-pointer -Wall -Werror -Wstrict-prototypes
  -Wa,-ahlms=dequant.lst -DAT91SAM9260_EK   -I../include  -I../../nut/include  ../../nut/hxmp3/dequant.c -o dequant.o
arm-elf-gcc -c -mcpu=arm9 -Os -mthumb-interwork -fomit-frame-pointer -Wall -Werror -Wstrict-prototypes
  -Wa,-ahlms=dqchan.lst -DAT91SAM9260_EK   -I../include  -I../../nut/include  ../../nut/hxmp3/dqchan.c -o dqchan.o
arm-elf-gcc -c -mcpu=arm9 -Os -mthumb-interwork -fomit-frame-pointer -Wall -Werror -Wstrict-prototypes
  -Wa,-ahlms=huffman.lst -DAT91SAM9260_EK   -I../include  -I../../nut/include  ../../nut/hxmp3/huffman.c -o huffman.o
arm-elf-gcc -c -mcpu=arm9 -Os -mthumb-interwork -fomit-frame-pointer -Wall -Werror -Wstrict-prototypes
  -Wa,-ahlms=hufftabs.lst -DAT91SAM9260_EK   -I../include  -I../../nut/include  ../../nut/hxmp3/hufftabs.c -o hufftabs.o
arm-elf-gcc -c -mcpu=arm9 -Os -mthumb-interwork -fomit-frame-pointer -Wall -Werror -Wstrict-prototypes
  -Wa,-ahlms=imdct.lst -DAT91SAM9260_EK   -I../include  -I../../nut/include  ../../nut/hxmp3/imdct.c -o imdct.o
arm-elf-gcc -c -mcpu=arm9 -Os -mthumb-interwork -fomit-frame-pointer -Wall -Werror -Wstrict-prototypes
  -Wa,-ahlms=scalfact.lst -DAT91SAM9260_EK   -I../include  -I../../nut/include  ../../nut/hxmp3/scalfact.c -o scalfact.o
arm-elf-gcc -c -mcpu=arm9 -Os -mthumb-interwork -fomit-frame-pointer -Wall -Werror -Wstrict-prototypes
  -Wa,-ahlms=stproc.lst -DAT91SAM9260_EK   -I../include  -I../../nut/include  ../../nut/hxmp3/stproc.c -o stproc.o
arm-elf-gcc -c -mcpu=arm9 -Os -mthumb-interwork -fomit-frame-pointer -Wall -Werror -Wstrict-prototypes
  -Wa,-ahlms=subband.lst -DAT91SAM9260_EK   -I../include  -I../../nut/include  ../../nut/hxmp3/subband.c -o subband.o
arm-elf-gcc -c -mcpu=arm9 -Os -mthumb-interwork -fomit-frame-pointer -Wall -Werror -Wstrict-prototypes
  -Wa,-ahlms=trigtabs.lst -DAT91SAM9260_EK   -I../include  -I../../nut/include  ../../nut/hxmp3/trigtabs.c -o trigtabs.o
arm-elf-gcc -x assembler-with-cpp -c -mcpu=arm9 -Wa,-amhls=asmpoly_gcc.lst -DAT91SAM9260_EK  -I../include
  -I../../nut/include  ../../nut/hxmp3/asmpoly_gcc.S -o asmpoly_gcc.o
arm-elf-ar rsv libhxmp3.a mp3dec.o mp3tabs.o buffers.o bitstream.o dct32.o dequant.o dqchan.o huffman.o hufftabs.o
  imdct.o scalfact.o stproc.o subband.o trigtabs.o asmpoly_gcc.o
arm-elf-ar: creating libhxmp3.a
a - mp3dec.o
a - mp3tabs.o
a - buffers.o
a - bitstream.o
a - dct32.o
a - dequant.o
a - dqchan.o
a - huffman.o
a - hufftabs.o
a - imdct.o
a - scalfact.o
a - stproc.o
a - subband.o
a - trigtabs.o
a - asmpoly_gcc.o
cp libhxmp3.a ../lib/libhxmp3.a
Building the Internet Radio Application
After having successfully built the decoder library, change to the webradio subdirectory within the Nut/OS application sample directory and again run 'make install'.
cd C:\ethernut-4.4.0\nutapp-sam9260-ram\webradio
make install
The resulting output should look like this:
arm-elf-gcc -c -mcpu=arm9 -Os -mthumb-interwork -fomit-frame-pointer -Wall -Wstrict-prototypes -fverbose-asm
  -Wa,-ahlms=webradio.lst -DAT91SAM9260_EK -IC:/ethernut-4.4.0/nutbld-sam9260-ram/include
  -IC:/ethernut-4.4.0/nut/include  webradio.c -o webradio.o
crurom -r -ourom.c html
arm-elf-gcc -c -mcpu=arm9 -Os -mthumb-interwork -fomit-frame-pointer -Wall -Wstrict-prototypes -fverbose-asm
  -Wa,-ahlms=urom.lst -DAT91SAM9260_EK -IC:/ethernut-4.4.0/nutbld-sam9260-ram/include
  -IC:/ethernut-4.4.0/nut/include  urom.c -o urom.o
arm-elf-gcc -c -mcpu=arm9 -Os -mthumb-interwork -fomit-frame-pointer -Wall -Wstrict-prototypes -fverbose-asm
  -Wa,-ahlms=httpserv.lst -DAT91SAM9260_EK -IC:/ethernut-4.4.0/nutbld-sam9260-ram/include
  -IC:/ethernut-4.4.0/nut/include  httpserv.c -o httpserv.o
arm-elf-gcc -c -mcpu=arm9 -Os -mthumb-interwork -fomit-frame-pointer -Wall -Wstrict-prototypes -fverbose-asm
  -Wa,-ahlms=config.lst -DAT91SAM9260_EK -IC:/ethernut-4.4.0/nutbld-sam9260-ram/include
  -IC:/ethernut-4.4.0/nut/include  config.c -o config.o
arm-elf-gcc -c -mcpu=arm9 -Os -mthumb-interwork -fomit-frame-pointer -Wall -Wstrict-prototypes -fverbose-asm
  -Wa,-ahlms=station.lst -DAT91SAM9260_EK -IC:/ethernut-4.4.0/nutbld-sam9260-ram/include
  -IC:/ethernut-4.4.0/nut/include  station.c -o station.o
arm-elf-gcc -c -mcpu=arm9 -Os -mthumb-interwork -fomit-frame-pointer -Wall -Wstrict-prototypes -fverbose-asm
  -Wa,-ahlms=receiver.lst -DAT91SAM9260_EK -IC:/ethernut-4.4.0/nutbld-sam9260-ram/include
  -IC:/ethernut-4.4.0/nut/include  receiver.c -o receiver.o
arm-elf-gcc -c -mcpu=arm9 -Os -mthumb-interwork -fomit-frame-pointer -Wall -Wstrict-prototypes -fverbose-asm
  -Wa,-ahlms=shoutcast.lst -DAT91SAM9260_EK -IC:/ethernut-4.4.0/nutbld-sam9260-ram/include
  -IC:/ethernut-4.4.0/nut/include  shoutcast.c -o shoutcast.o
arm-elf-gcc -c -mcpu=arm9 -Os -mthumb-interwork -fomit-frame-pointer -Wall -Wstrict-prototypes -fverbose-asm
  -Wa,-ahlms=player.lst -DAT91SAM9260_EK -IC:/ethernut-4.4.0/nutbld-sam9260-ram/include
  -IC:/ethernut-4.4.0/nut/include  player.c -o player.o
arm-elf-gcc -c -mcpu=arm9 -Os -mthumb-interwork -fomit-frame-pointer -Wall -Wstrict-prototypes -fverbose-asm
  -Wa,-ahlms=mp3player.lst -DAT91SAM9260_EK -IC:/ethernut-4.4.0/nutbld-sam9260-ram/include
  -IC:/ethernut-4.4.0/nut/include  mp3player.c -o mp3player.o
arm-elf-gcc -c -mcpu=arm9 -Os -mthumb-interwork -fomit-frame-pointer -Wall -Wstrict-prototypes -fverbose-asm
  -Wa,-ahlms=at73dac.lst -DAT91SAM9260_EK -IC:/ethernut-4.4.0/nutbld-sam9260-ram/include
  -IC:/ethernut-4.4.0/nut/include  at73dac.c -o at73dac.o
arm-elf-gcc webradio.o urom.o httpserv.o config.o station.o receiver.o shoutcast.o player.o mp3player.o at73dac.o
  -mcpu=arm9 -nostartfiles -TC:/ethernut-4.4.0/nut/arch/arm/ldscripts/at91sam9260_ram.ld
  -Wl,-Map=webradio.map,--cref,--no-warn-mismatch -LC:/ethernut-4.4.0-rc10/nutbld-sam9260-ram/lib
  -Wl,--start-group C:/ethernut-4.4.0/nutbld-sam9260-ram/lib/nutinit.o
  -lnutpro -lnutnet -lnutfs -lnutos -lnutdev -lnutarch -lnutcrt -lhxmp3  -Wl,--end-group -o webradio.elf
arm-elf-objcopy -O ihex webradio.elf webradio.hex
arm-elf-objcopy -O binary webradio.elf webradio.bin
cp webradio.hex C:/ethernut-4.4.0/nut/bin/arm9/webradio.hex
cp webradio.bin C:/ethernut-4.4.0/nut/bin/arm9/webradio.bin
In the last line the resulting binary is copied to bin/arm9 inside the Nut/OS source tree.
SAM7X Implementation
Hardware Installation
All connectors should be removed from the AT91SAM7X-EK Board. Plug the single row header socket of the Calypso Board on row C of the triple row header of the AT91SAM7X-EK. Make sure that all 32 pins are connected.
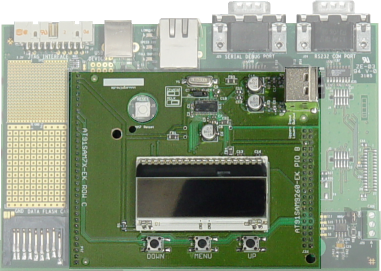
When applying power to the AT91SAM7X-EK Board via the USB connector, the back-lit LCD will go on, but nothing will be displayed yet.
Software Installation
This ![]() Shockwave Flash Tutorial will guide you through the whole
procedure of creating the Nut/OS libraries for our radio. It is a good idea to
start the Nut/OS Configurator from the Windows Start Menu now and follow the
demo step by step.
Shockwave Flash Tutorial will guide you through the whole
procedure of creating the Nut/OS libraries for our radio. It is a good idea to
start the Nut/OS Configurator from the Windows Start Menu now and follow the
demo step by step.
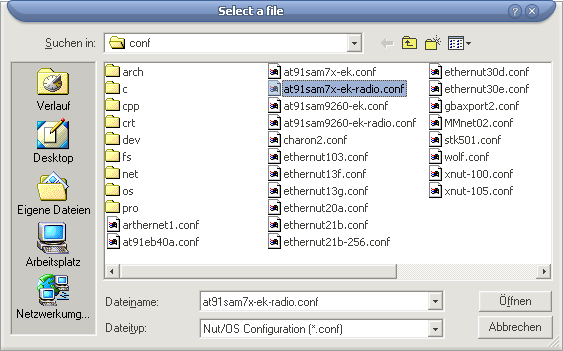
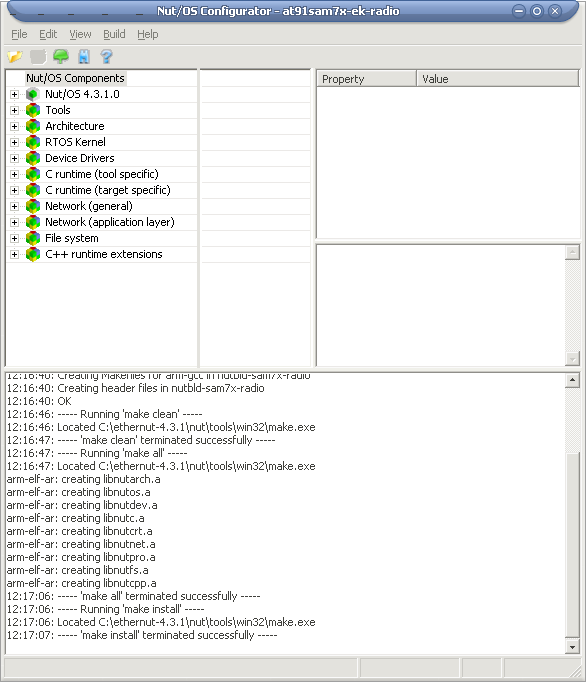
We installed Nut/OS in C:\ethernut-4.4.0\ and chose C:\ethernut-4.4.0\nutbld-sam7x-radio\ for the build tree and C:\ethernut-4.4.0\nutapp-sam7x-radio\ as the application (sample) directory. However, you are free to choose different directories. Here's the result of our build:
Application Program Modules
This chapter provides a rough overview of the program structure.
A Detailed Program Documentation had been generated by the Doxygen Tool .
Known Problems and Limitations
Limited User Interface
Most items are hardcoded, specifically the list of radio stations.
SAM7X Limitiation
Currently only mono stations with 16kHz sampling rate are supported.
Frequently Asked Questions
Hardware
Can I order ready build Calypso Board from you?
Calypso Boards can be purchased online from www.egnite.de
. International orders are accepted, payment can be done by credit card or
bank transfer.
Can I order bare PCBs of the Calypso Board from you?
No, but the Eagle
CAD file of the board layout is available in the appendix of Atmel's
application note. Many board houses accept Eagle Board Files.
Can I alternatively use the AT73C213 DAC, which is available on the
SAM9260-EK Board?
Yes, but the source code needs to be modified. More on this later...
Is the SAM7x256 version really usable?
Yes, but it is limited to low bitrates only and may be used for transmission of speech
(news services etc). Furthermore it will work fine at higher bitrates in local networks.
How about the AT91SAM7x512?
The additional 64kB RAM will help a lot, though it is still below the optimal
300-500kB. The additional 256kB Flash will be fine for adding additional
features like the web interface, which had been excluded on the AT91SAM7X256.
Note however, that such features may also use scarse RAM. Keep in mind, that the
SAM7X network controller has no dedicated RAM for buffering Ethernet packets.
Instead it occupies CPU RAM.
Software
Why do I get a "time_t undeclared" error when compiling the radio
application?
This error occurs, when trying to build application version 1.0.2 or earlier
with Nut/OS 4.3.9 or any later version. To fix this, either upgrade to a newer
application release or add the line
#include <time.h>to the source file mp3player.c.
Similar Projects
www.mikrocontroller.net/articles/ARM_MP3/AAC_Player
Andreas Schwarz presents an MP3/AAC player running on the AT91SAM7S256. His
excellent work helped a lot to get the SAM Internet Radio done.
www.circuitcellar.com/AVR2006/winners/DE/AT2581.htm
This versatile wireless Internet music player by Mohammed Rana Basheerwon won a
price in the 2006 AVR Design Contest. It is built around the AT90CAN128 and
plays music from Internet radio stations and shared network drives.
...and last not least our good old Ethernut/Medianut based AVR Internet Radio
Good luck,
Harald Kipp
Castrop-Rauxel, 22nd of September 2007
